
![]()
![]()
![]()
![]()
![]()
![]()
![]()
![]()
![]()

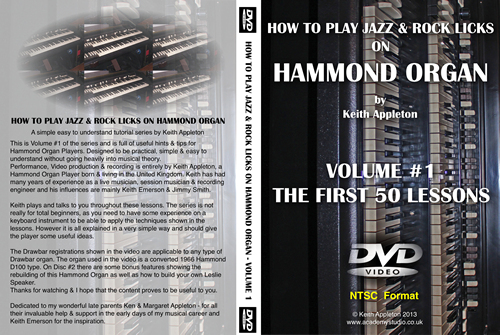
***** NOW AVAILABLE ON DVD *****
The First 50 Lessons of
"HOW TO PLAY JAZZ & ROCK LICKS ON HAMMOND ORGAN"
PAL or NTSC Format
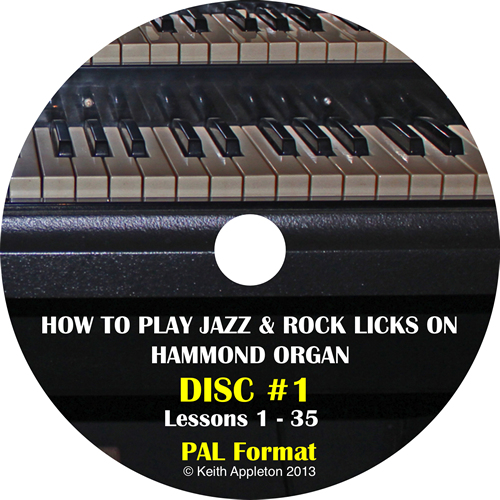 Two
DVD Set
Two
DVD Set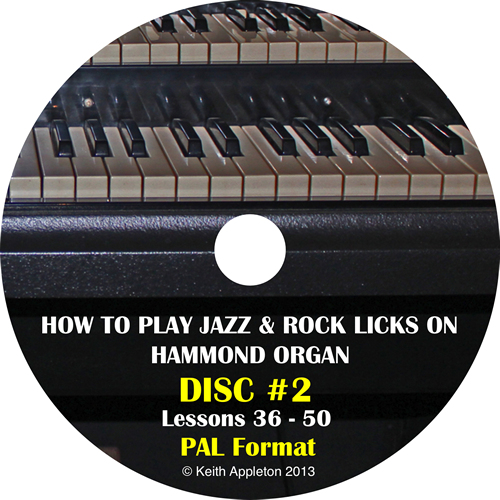
PAL or NTSC Format
only £19.99
(plus postage & packing)
Please Order using the Paypal Button Below
*** IMPORTANT ***
PLEASE SELECT THE POSTAGE RATE
FOR YOUR COUNTRY FROM THE DROP DOWN MENU BELOW
Here are samples of my Youtube Online Hammond Organ Tutorials
NOW AVAILABLE AS A TWIN DVD SET
How to play Jazz & Rock licks on a Hammond B3 or C3 Organ
http://www.youtube.com/playlist?list=PL0A455BF0C61CD58F&feature=view_all
Hammond Organ Lessons for Beginners
http://www.youtube.com/playlist?list=PLFB1BAB2058EB27DC&feature=view_all
As far as electronic organs go, Hammonds are the best
Absolutely no crappy theatre organ or "Sooty" organ emulation here, just Hammond Organs.
I currently have a Hammond C3 & two custom 145 Leslie speakers for use in the studio.
This is a video with details about the rebuild
The story starts around 1968 when I was 15 years old and I first saw "The Nice", who became "Emerson, Lake & Palmer" later on.
A necessary step I suppose for Keith Emerson's musical developement, but I liked the feel of Lee Jackson's bass playing in the "Nice" days...........
The band were late for this gig in Leeds, so everyone stood in this overpacked hall for 4 hours, some even passed out with the heat, but the gig was one of the most memorable ones I've ever seen....... real playing, no sequencer shit in those days, just raw talent. I was mesmerised by Emerson & his battered Hammond L102, and at the end of the gig I stood down at the front watching the roadies strip down the gear & realised that that was what I needed to do, play a Hammond Organ. I had tried guitar, but it felt wrong ..... so I started piano lessons with an incredible old lady, Mrs. L. Machell, who passed away years ago - she was 75 years old when she taught me how to play. Mrs. Machell could sight read anything at the correct speed, with a minimum of errors. While studying, I used to take her the most difficult pieces of sheet music I could find, Liszt, Bach etc....... she would light a cigarette & just play them straight off !!! I have never managed to be that competent at sight reading!
Although taking piano lessons, I've never been in love with piano, & at that time I had a "Gem Imperial Duo" portable electronic organ. Hammonds were very expensive in those days. Anyway, I took classical piano lessons to grade 5, then went on a summer season with a band, so I didn't take any more lessons or exams.
My first Hammond Organs
My first one was an L102 spinet model, the same as Emerson's, but in better condition! I travelled this about the country in my van with a local group, then my life changed dramatically - I met Jim Dereck!
From just playing in bands, to learning the music business at root level...... . I have Jim to thank for this - a great pro (Thanks Jim for your patience) After a few teething problems with my inexperience, I learned fast, so then followed a summer season, followed by winter in a nightclub with the Jim & the band, followed by another summer season. the van was parked it up in the summer, my Hammond L102 was on the stage of a holiday camp ....... happy days ........ back to the story ..................
All this abruptly ended when I broke my leg in a car accident. I returned to the North of England, & sat about a lot while the leg repaired itself. After this, I bought an Model M100 Spinet Hammond Organ. This was in absolutely Immaculate condition, & the salesman in the posh organ shop was horrified when I told him what I wanted It for. I modified it!
Removing this & that to make it scream, 2nd & 3rd harmonic percussion to make you ears bleed, I even cut away the swell pedal hole for a wah wah pedal, big handles, steel reinforcing frame etc etc etc etc ............ very sad really, on such a lovely piece of furniture..........! still I was not content, I needed a C3.............
In 1976, I heard about a Hammond C3 for sale at a "working men's club" in Yorkshire. I borrowed the money (£800.00) & rushed out to buy it. (£800.00 for a C3 in 1976 was a very good price). At present, the prices are really starting to climb, but only about 5 years ago (1993) they could easily be bought for £250.00 - sometimes with a Leslie 145!!!!............ some people even gave them away...to get rid of them !!!!!! (Back to the tale) ...... On the way back from the club in my old van, I angled the interior mirror so I could admire my Hammond C3 in the back ...............When I got it home, it would not fit through my house door, so I hired the use of a neighbour's garden shed & spent the next day checking it out, kitting it for my Leslies & generally tweaking it about a bit..!!!! Then almost immediately, by chance I met up with Jim Dereck, freshly back from the states & again we set off on another summer season. I came back up North at the end of 1978 ...............
Thinking about it,in retrospect, I would have been a much better player, if I hadn't kept taking the back off the organ & getting into it with my soldering iron! ........ but after a while I knew the workings of Hammond organs inside out......
Especially the HAMMOND C3 ............
"Northern Organ Centre" commenced in about 1980? with Mr. Paul Fletcher, but soon afterwards I chose the option to work with him rather than the original partnership idea as our ideas on how to do it were in conflict. Anyway, this venture involved repair & refurbishment of all types of Hammond Tonewheel organs, after a while, Dismantling & rebuilding of Hammond C3 organs was something I could do in my sleep! as time went by the organs were coming in in an ever increasing bad condition, some having very severe faults (dropping to bits!) 0nce, we collected some old Hammonds from a Flooded Warehouse in Liverpool. As I was wading through the water in my wellies, I kicked something........ groping about in the water I found a C3 pre-amp, which had been underwater for six months! after a couple of months on the workshop shelf, out of curiosity, I powered it up and to my surprise it worked!!!
I worked on a Hammond B3 organ, which had been used in a pub for the last 12 years at the time, to support a large tropical fish tank......! with the leaks & grime it was in a bit of a state, but after prising open the lid's rusty hinges, it powered up & worked first time.....try that with digital stuff!!!!
I never fail to admire the genius of Laurens Hammond whenever I find myself inside a Hammond organ. The tonewheel generator is truly a mechanical work of art, as is the synchronous motor, (also invented by Laurens Hammond - not forgetting his invention of 3D glasses - !) with cotton threads from the central oil reservoir for lubrication of the plain phosphor bronze bearings, other organ systems have tried to emulate the mechanics of the Hammond, some using electrostatic disks, but none even come close for reliability or sound - I love American engineering - !
The principle (for those of you who don't know) is as follows:
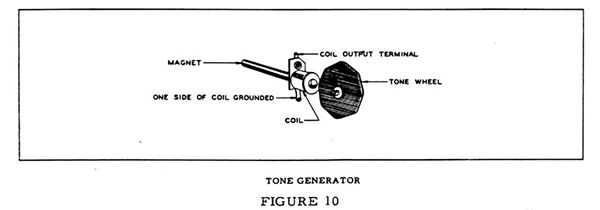
Principle of the tonewheel generator (see figure 9)
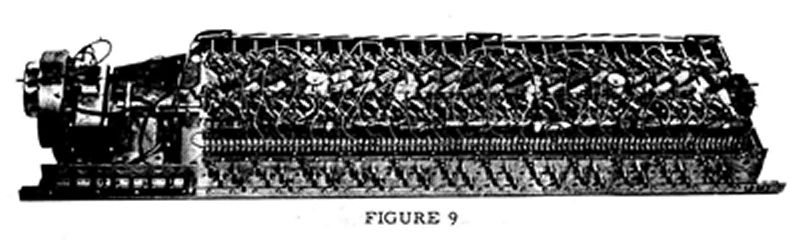
Each iron disk has a wavy edge, of varying dimensions, some coarse, (low frequency), some medium, (mid frequency) & some fine (high frequency). When these disks are rotated at different speeds, (from a central synchronous motor & gear train), in front of a magnet with a coil of wire around it, a current representing the frequency is generated...... (figure 10)
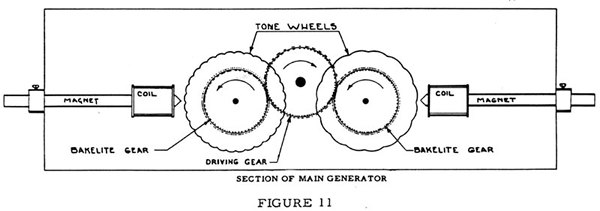
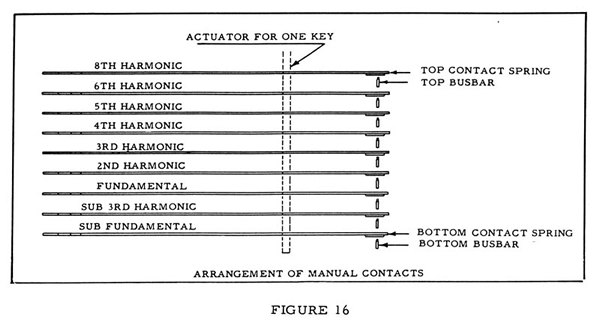
(Hence ..... "Tonewheel Generator") so ........... take 91 or so of these, mount them in a rigid frame, (figure 11) all with coils adjacent, & you get many near sinewaves generated, which via multi-key contacts are switched out to an pre-amplifier. (figure 16)
As there are inaccuracies in the system, the tones are not 100% perfect so then we get the starting point of the Hammond Tonewheel sound. The frequencies generated are a bit rough in fact, so a arrangement of coils & capacitors on the top of the generator, start the process of smoothing out the waveform, further capacitors connected to ground in the pre-amp, filter the harshness & key click even further. The end product routed via the drawbars, is the "pureHammond organ sound we all know & love!
Yes, I know this is an over-simplified explanation, but simple is good!
For live work, I used to modify things, (not the coils & capacitors on the generator though) but I used to put a switch in series the two capacitors on the pre-amp mainboard to act as a treble boost, also I used to make switchable, a capacitor just behind the centre terminal box on the pre-amp. This made the percussion very unruly & the key click, which Hammond used to try to disguise, came right up front....... Great for solos ....... The best compliment I ever got was from the wife of a pro drummer friend of mine, she said that she had travelled all over with her husband on gigs, & he had worked with many well known accomplished organists, but mine was the most unpleasant Hammond sound she had ever heard!, she said it was like having notes hammered into your ear with a sledgehammer! .....Great ...........my happiness was complete....!!! at the time she said that, she was at the back of the hall !!!!! at that time, I used only one Leslie 145, which was miked up through one Marshall 100 watt amp & 4 x 12 cab, & the organ straight signal attenuated & plugged into the front of another Marshall 100 watt & 4 x 12 cab. This was my modest portable system, When I was resident anywhere, I could use my main system . . . . . .
Along with various keyboards of the period (1970's) Rhodes, Clavinet, Minimoog, Arp Pro-Soloist, Korg 700s & "Logan string machine", I used four Leslie 145 cabinets (Miked up), reverse horn loaded 2 x 18 inch loudspeakers for bass pedals, 8 x 12 inch speakers for keyboards & organ "straight" channel & 4 x 15 inch speakers for extra low - mid body & 4 ten inch speakers for a bit of cut.......all driven with about 1 kilowatt, a lot of power for a back - line in the 70's ...... The sound was stunning, pure delight to play with, indeed I played a lot then......7 Nights a week & 5 lunchtimes !!!!!!! For successful amplification of a Hammond organ, or any keyboard system, the answer is simple..... Watts & Cabs, & lots of them, but not too much as to not be able to overdrive the valve amplifiers.
The distortion curve of a Leslie valve amp is just right, Leslie got it wrong with the transistor Leslies, the input pre-amp/driver has insufficient headroom, & when it is clipped, it sounds awful.
Some mis-informed people claim that the B3 sounds better than the C3, but that is bullshit.....! on page number 1 of the official Hammond service manual (Bible) it states that the only difference between the C3 & B3 models is the cabinet style, which has no bearing on the sound at all.
Why do C3 Hammonds sound bigger, fatter & better than spinets?
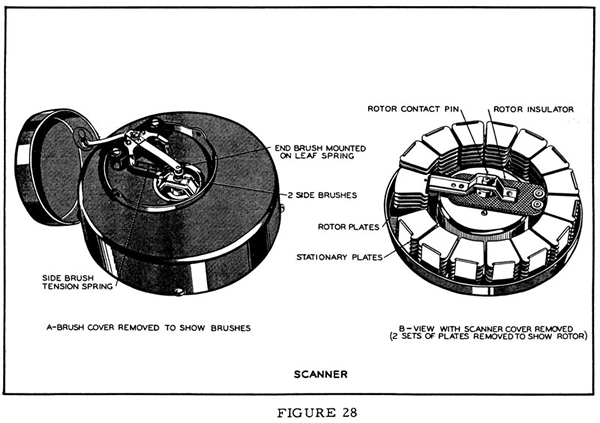
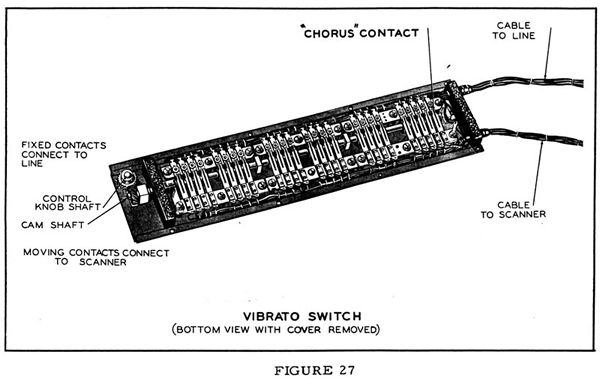
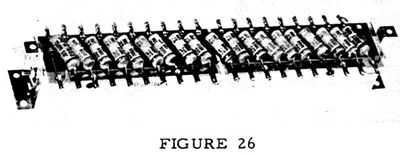
It's the generator coils............ believe me I tried everything!!!! ........... on the C3 generator there are copper rings on the pickup coils, which are not present on the spinets (except M3) They act as a damper to the produced sine wave tone, therefore eliminating any ring, however small, which in practise is definitely very audible to the keen player's ear. It feels like dynamic compression. Then there is the vibrato chorus of the big Hammonds. A truly sensational component of the system. A vibrato scanner (figure 28) is driven by the same motor that drives the tonewheels, this scanner scans a coil & capacitor delay line (figure 26) & pitch modulation (vibrato) of the generator tone is produced. A rotary helical geared cam-driven multi pole switch (figure 27) controls the amounts & type of vibrato & chorus. To obtain the chorus effect, some straight signal is mixed back in with the vibrato channel & the end result is the famous Hammond vibrato chorus, as used by everybody.
A quote straight from the bible (Hammond Manual):
A vibrato chorus effect, similar to the effect of two or three slightly out-of-tune frequencies mixed together, is obtained when the vibrato output signal is mixed with a portion of signal without vibrato. For vibrato chorus, part of the incoming signal appears across the vibrato line and the rest across a resistor in series with the line. As the vibrato effect is applied to the part of the signal appearing across the line, but not to the part appearing across the resistor, the combination produces a chorus effect. For normal vibrato, this resistor is short-circuited.
 On
the Hammond model M3 spinet, (an old one with a 12 note bass pedalboard) the
Vibrato system is very similar to the C3, & also the M3 features the copper
ringed generator, so it sounds very much like a C3. But the drawback is, as
in all spinet models, that the high frequency footages do not go all the way
to the top of the keyboard & the percussion cut-off stops at F#, just over
half way up the keyboard. It is a good compromise for gigs, as it doesn't weigh
as much as a C3.In fact I have a couple of M3 keyboard units, & the keys
& stop tabs are interchangeable with a C3. The model M100 has a watered
down version of the scanner vibrato system & has a standard generator, so
the sound quality is thinner. L100 organs don't have a scanner, a valve circuit
creates the vibrato, & the chorus is weedy ...... not so good.
On
the Hammond model M3 spinet, (an old one with a 12 note bass pedalboard) the
Vibrato system is very similar to the C3, & also the M3 features the copper
ringed generator, so it sounds very much like a C3. But the drawback is, as
in all spinet models, that the high frequency footages do not go all the way
to the top of the keyboard & the percussion cut-off stops at F#, just over
half way up the keyboard. It is a good compromise for gigs, as it doesn't weigh
as much as a C3.In fact I have a couple of M3 keyboard units, & the keys
& stop tabs are interchangeable with a C3. The model M100 has a watered
down version of the scanner vibrato system & has a standard generator, so
the sound quality is thinner. L100 organs don't have a scanner, a valve circuit
creates the vibrato, & the chorus is weedy ...... not so good.
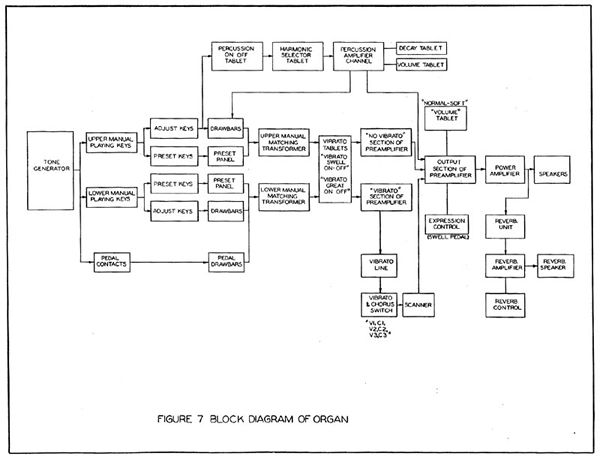
Figure 7, from the service manual shows the schematic block diagram of a Hammond C3 type. pretty good eh?
 What
went wrong?
What
went wrong?
Obviously the manufacturing costs of the tonewheel Hammond organ sounded it's death knell a long time ago, but what puzzles me, is why none of the large American & Japanese companies are able to get anywhere near the original sound, even today. Do they consult the wrong people? Are they hard of hearing? It is bizarre that professional have to use an instrument that is thirty odd years old (or older), to get the sound that they want. I feel that I could do it, but with a different approach than the big Electronics companies. i.e.: preserving some of the free-phase elements of the original. A very simple basic design approach to creating a simple instrument, just like the late Laurens Hammond did in the 1930's.
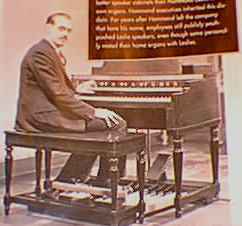
Laurens Hammond, genius of the 20th Century at the original 1935 organ ..............
 His gravestone .............
Classic Photographs - Before & After!
Here he is, the man himself, Laurens Hammond sat at an early model A series. In appearance this organ looks like a B3, but is much smaller, it hasn't any 2nd & 3rd harmonic percussion, or vibrato, only a weird mechanical tremolo system, driven from the generator motor via a cam & follower..... . I had on of these for a while (1935 model), but sold it, even though it worked fine, owing to the keys being very square-edged & uncomfortable to play on!......ouch!!!
Myths exploded
Hammond A100, B3,C3 & RT3 Hammond organs, all have the same type of generator & keyboard assemblies.
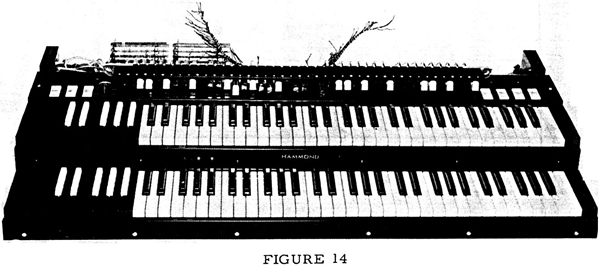 The
only difference between them being that early type with rhe squarer cabinet
with protruding edges around the top, use rectangular section busbars (contact
rails) with palladium wire contact areas, & the later models with no wood
overhanging & a rounded lid (which cracks easily) used round section gold-plated
busbars. the latter are more prone to bad key contact, but on old Hammonds,
the palladium wire often comes unfixed from the bus rail & causes problems.
either way the use of silicon grease is definitely not a good idea, as after
a while it picks up dust & becomes very grimy.
The
only difference between them being that early type with rhe squarer cabinet
with protruding edges around the top, use rectangular section busbars (contact
rails) with palladium wire contact areas, & the later models with no wood
overhanging & a rounded lid (which cracks easily) used round section gold-plated
busbars. the latter are more prone to bad key contact, but on old Hammonds,
the palladium wire often comes unfixed from the bus rail & causes problems.
either way the use of silicon grease is definitely not a good idea, as after
a while it picks up dust & becomes very grimy.
Advanced microphone techniques for the recording of Hammond organs
MISCELLANEOUS HINTS & TIPS FOR HAMMOND ORGAN OWNERS
GENERATOR OIL & OILING
DO NOT OVER OIL THE GENERATOR & MOTOR
IF YOU DO, THE OIL CREEPS INTO THE SCANNER (ON THE END OF THE MOTOR) & CONTAMINATES THE CARBON CONDUCTOR, WHICH CAUSES CRACKLY VIBRATO NOISES. THE CARBON DISC WILL EVENTUALLY DETERIORATE & DISAPPEAR ALTOGETHER INTO BITS IN THE BOTTOM OF THE SCANNER HOUSING. FINDING A REPLACEMENT COULD PROVE DIFFICULT. IT IS A CARBON DISC WITH A HOLE DRILLED IN IT, SO I SUPPOSE IT'S POSSIBLE TO IMPROVISE BY MACHINING A BIT OF AN INDUSTRIAL MOTOR BRUSH & DRILLING IT, BUT I'D RATHER NOT.
TYPE OF OIL TO USE
RECENTLY I WAS ASKED ABOUT THIS PROBLEM, OWING TO "HAMMOND GENERATOR OIL" BEING UNAVAILABLE WHAT I AM ABOUT TO STATE MAY NOT BE AGREEABLE TO EVERYONE, BUT ........ I HAD AN OLD C3 FOR 12 YEARS & I USED TO USE "3 IN ONE" OIL IN IT, ONCE A YEAR. I WORKED WITH THIS ORGAN PROFESSIONALLY, SIX OR SEVEN NIGHTS EVERY WEEK OVER THE 12 YEARS, WITH NO ILL EFFECTS AT ALL. I ONCE BOUGHT A LARGE TIN OF "GENERATOR OIL" FROM HAMMOND, THIS WAS REALLY CRUDE STUFF & SMELT LIKE DIESEL FUEL. IF YOU ARE STUCK, TRY CONTACTING A SPECIALIST OIL SUPPLIER LIKE "HENRY HILL" (BATLEY, WEST YORKSHIRE) & STATE CLEARLY THE APPLICATION THAT YOU NEED IT FOR, INCLUDE DETAILS OF BEARING TYPE ie: PHOSPHOR BRONZE
DO NOT USE ANY KIND OF "PENETRATING" OIL - "WD40" IS OUT OF THE QUESTION.
DO NOT USE CAR ENGINE MOTOR OIL OR GEAR OIL
KEY CONTACT PROBLEMS
NOT SURPRISINGLY, INTERMITTENT KEY CONTACTS ON MACHINES OF THIS AGE ARE COMMONPLACE ON THE HAMMOND C3 & OTHER HAMMOND TONEWHEEL ORGANS. TO RESOLVE THE PROBLEM, DO NOT JUST HOLD THE KEYS DOWN WITH A PLANK OF WOOD & TURN THE BUSBAR SHIFTER SCREWS. THIS WAS A BRILLIANT INNOVATION AT THE TIME FROM MR. HAMMOND, BUT AFTER ALL THESE YEARS, ALL YOU WILL END UP DOING IS RE-DISTRIBUTING THE DIRT. THE KEY CONTACTS WILL GET WORSE. YOU MAY EVEN DAMAGE THE PALLADIUM WIRE ON THE OLDER TYPE OF ORGAN. (SEE NOTES ABOVE ABOUT CABINET TYPE & AGE) WHAT YOU NEED TO DO IS PHYSICALLY REMOVE THE BUSBARS & CLEAN THEM WITH ISOPROPYL ALCOHOL. IT IS NOT RECOMMENDED FOR THE FAINT HEARTED, BUT HOW YOU DO THIS IS AS FOLLOWS:
BE CAREFUL & THINK
REMOVE THE LARGE BOLTS UNDERNEATH THE CABINET WHICH HOLD THE KEYBOARD UNITS IN PLACE. REMOVE THE MUSIC RACK RAIL & POWER SWITCHES. REMOVE THE LARGE BOLTS EITHER SIDE OF THE MANUALS TO SEPERATE THEM. WITH THE HELP OF AN ASSISTANT CAREFULLY LIFT UP THE MANUALS TO THE RIGHT, UPPER MANUAL FIRST (FROM THE FRONT) UNTIL YOU CAN GET AT THE BUSBAR COVER PLATES. UNDO ANY CABLE STRAPPING TO ALLOW THIS TO HAPPEN, BE CAREFUL OF THE GENERATOR WIRES, THEY ARE SOLID CORED & CAN SNAP EASILY.REMOVE THE SMALL WOOD SCREWS HOLDING THE BUSBAR METAL COVER PLATES. SLACKEN, BUT DO NOT REMOVE THE SCREWS HOLDING THE SLOTTED BUSBAR SECURING PAXOLIN PLATES IN PLACE. CAREFULLY WITHDRAW THE 1st BUSBAR & CLEAN IT. REPLACE 1st BUSBAR CAREFULLY & FEEL YOUR WAY WITH IT ALONG THE GUIDES. A MIDWIFE'S TOUCH IS DEFINITELY REQUIRED HERE, DO NOT UNDER ANY CIRCUMSTANCES FORCE IT.
THEN ...........
WITHDRAW THE 2nd BUSBAR, INSPECT, CLEAN & REPLACE THEN JUST REPEAT THE SAME PROCESS FOR ALL THE REST. EASYINNIT? WHEN ALL ARE RE-FITTED, POSITION THE BUSBAR SHIFTER IN A CENTRAL POSITION AFTER SLIDING THE SLOTTED PAXOLIN COVER PLATE BACK & RE-TIGHTENING THE SCREWS. I'VE DONE THIS JOB SO MANY TIMES, I CAN DO IT ALMOST BLINDFOLD!
RE-ASSEMBLY IS THE REVERSE OF DIS-ASSEMBLY!!
PLEASE NOTE:
DO NOT UNDER ANY CIRCUMSTANCES USE SILICON GREASE SPRAYS, OR ANY PROPRIETARY CLEANER THAT LEAVES A DEPOSIT. ALL THIS GREASE DOES IS ATTRACT MORE DUST! IF YOU OWN AN OLD C3 WITH THE SQUARE TYPE BUSBARS, BE VERY, VERY CAREFUL. IF THE PALLADIUM CONTACT WIRE IS DAMAGED & DETACHED FROM THE BUSBAR THE BEST THING TO DO IS EITHER REPLACE THE BUSBAR IF YOU CAN GET ANY, OR AS A LAST RESORT REMOVE ONLY THE DAMAGED BIT OF PALLADIUM WIRE. THE LATER TYPE USE ROUND GOLD PLATED BUSBARS, THESE ARE NOT AS FRAGILE, BUT SADLY NOT AS GOOD AT THE JOB.
WARNING:
IF YOU ARE IN ANY DOUBT AT ALL, AS TO YOUR ABILITY TO DO THIS JOB, THEN YOU MUST SEEK PROFESSIONAL HELP. IF YOU SCREW UP WITH THE BUSBARS, THEN YOUR BELOVED C3 WILL BE IRREPAIRABLY DAMAGED. BE WARNED!
Thanks for visiting the Academy site